Tuesday, July 17, 2012

Office Chair Re-do

I have been working on my closet office  It is looking better, but, not quite done yet.  I did want to show you my chair though.


This is what I started with -- sorry, I forgot to take a before picture.  However, it was a chair just like this, only all white.


This is a chair pad my kids got me for Christmas.


The bottom is very sticky (even picked up some paint -- YIKES).   However, it is very ugly (sorry kids).  It also made me feel older.


Now, this is the coolest thing ever, this is an awesome burlap sack.  I ordered it from burlapfabric.com.  What a wonderful cover for my ugly cushion.


I wanted to keep the sticky on the back so the pad won't slide around.  I just measured the top and sides and cut a piece out.  I love the stripe, so I made sure that is would be on the piece I cut out.


This is awesome if you don't want to sew (or don't know how).


Just run a line all around the burlap so it wont unravel on you.


I pinned the cushion together because that is how it looks in the chair and I wanted a snug fit.


I waited for the glue to dry then I sprayed it with tacky glue and pressed it down smooth.  I just tucked and glued all the edges.  I now the underneath is not pretty, but, I wanted to keep the sticky part so it would hold in my chair in place.


I then took some black paint, a brush and added No. 1 to it with some stencils I got from Wal-Mart.


Not too bad.  I like it much better than the the solid black pad.  Now on to the chair.


It was an old chippy white chair.  I didn't sand it because I wanted the chippy look to show through. I'm happy with the way it turned out.  I just used a glossy yellow paint from Wal-Mart.


I did sand it in areas and used a little stain to help the distress show through.


Well, that is that.  What do think?
Thanks for stopping by.
Rhonda

Tuesday, July 10, 2012

A Mini Pedestal Bowl

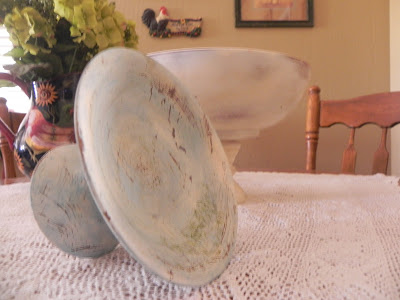
Over the past school year, I collected a few treasures so I would have things to create over the summer.  I always have high expectations for my summer break.  I go from six to eight kids to only two.  However, two of our family members were called home to be with Jesus, and, we are still dealing with my husbands ailing parents.  So, when I looked at the calendar and realized I have only four weeks left of my time, I felt a little panic.  With that said, here is one of my little projects I have had in my head for about four months.  I don't know why, but, I love pedestal bowls.  I adore my larger one and use is all over the house -- especially for the holidays.  This one is smaller and I just know I am going to love it too.  Here it is.  I tried a little turquoise on this one.  What do you think?


This is what I started with.  I got it at one of my favorite thrift stores for only .75.  Wow, I didn't realize how dusty is was before I started, is my face red.


Painting it was fun.  I mixed colors and used a rag to do most of my painting.  I am so proud because, I used to be so afraid to paint things.  What if I mess it up????  I can honestly say, I don't have that problem any more -- he he


Have you seen the moss covered rocks in the nicer catalogs?  They are very expensive so you can see why I was so excited to find these little beauties at the Dollar Tree -- YIPPEE!!!


They were a bit too green so I just dotted a little wood finish on them and the color toned right down.


I am really digging the way it turned out.  
Thanks for stopping by.
Rhonda


Friday, July 6, 2012

Up-cycled Ribbon Holder

I had this project going when I made my daughter's ribbon holder (go here to see Jean's).  I got the idea from Jen, at Scissors and Spatulas.  I just love her style.  Anyway, here is what I came up with. 


Here is Jen's.  I like that hers is a little more compact (go here to see more of Jen's ribbon holder and stay awhile to be inspired).


This is what I started with.  It was a plate holder I found at Goodwill.


I added two more dowels with ordinary cup hooks.  The dowels just slide right through.


I think I will add more hooks and a dowel to the middle.


I also used little black rubber O rings thingies to hold the dowels in place (you can see one on the first dowel).


Filled it up with ribbon and now I am working on my laundry/craft room so I can hang this bad boy up.


I LOVE MY CHALKBOARD LABELS.

How do you store your ribbon?

Rhonda


Monday, July 2, 2012

Drink Carrier Paper Organizer

Hi everyone, I am back, and re-using my drink containers.  I know -- please don't judge me on how many I have.  It is so very HOT here in Arizona.  Ok,back to my containers.  I was a little upset after Christmas when I found out that my efficient husband packed away my wrapping paper container.  It did have some Christmas paper in it, but, it had ALL of my other occasion paper as well.  I was also cleaning out a cabinet and found more contact paper than I knew I had.  This is how I am using a couple of those containers now.


I really enjoyed using those snazzy chalkboard painted labels.


Remember this?  My friend really appreciated it, and, she recycled it to one of her friends (read about it here)


I shot some white paint on it and stamped some sunflowers.


Attached a label (I even had a sunflower sticker), and, filled it up.


One for gift wrap, and,


one for contact paper.


I tied a little jute twine around the rolls to keep them from tipping over.


Easy Peasy with a little sunflower squeezy.
(My son said, "how cheezy")

What trash have you saved lately????

Rhonda


Chicken Enchilada Casserole

It has been awhile since I've posted a recipe and menu plan for the week -- my bad.  I am showing you my chicken enchilada casserole.  Can you tell we love Mexican food??  This is a recipe we used to call Gringo Enchiladas, you'll see.


It is very yummy.


I started out by boiling three large chicken breast (right from the freezer) in a little salted water.  I don't boil too long or it dries out because you have to put it in oven too.


I like pablano peppers.  You can always use canned chopped green chili too.  My sister puts jalepenos in hers.  Any way I like to toast fresh ones in a dry skillet.


Roast them untill they are black and blistered well.


Put them right into a plastic bag and leave for about 15 to 30 min.


While waiting for my chilis to steam, I toast my corn tortillias in a dry skillet.


I like them to turn a little black and blister up too.


See how the steam from the bag loosens the skin???


I just put it in a paper towel and rub the skin right off.  It makes it soo easy when you do it this way.  The charred black part comes right off but leaves a wonderful flavor.


I scrape all seeds off and dice up.


Shred chicken and add to a bowl with the diced pepper.


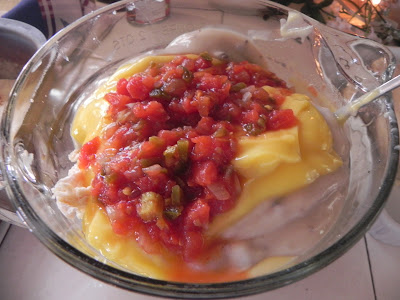
I add a can of each, cream of celery, mushroom and chicken (the gringo part) soup and a can of Rotel tomatoes (I am the store brand queen).


This is the best salsa in the world if you don't want to make your own.  You can also omit the Rotel and add this instead, yum.


Mix it up with a large hand full (or two) of cheese.


I like colby jack.


layer your tortillas, you can see I used six.


Add half of the soup mixture and some more cheese.


Start again.  Here is where it gets tricky.  I didn't have enough corn tortillas so I used, 


tortilla chips instead.  It works well and you can't tell the difference in taste.


Spread the rest of the soup mixture,


add some cheese,


and bake in 350 oven for about 30 min.


I love a salad with just lettuce, radishes. and vinegar and oil.  This combination is great with all Mexican food.


There you have it -- it really is yummy.


Remember, you can let me know if you would like me to feature a recipe from this week's chicken feed:

Monday - Spaghetti, salad
Tuesday - Chicken Club with Spicy Sweet Potato Fries
Wednesday - Hamburger, Hot Dogs, Tortellini Salad
Thursday - Chicken, noodles with Philadelphia Cream Cheese
Friday - Homemade Pizza
Saturday - BBQ Dad's Choice
Sunday - Ham Steaks, Potato Salad

Enjoy!

Rhonda